These tie-top curtains are easy to make and a good project for a beginner. There are no linings, curtain rings or heading tapes - they simply tie in place on a curtain pole. For more projects like this go to the Country Homes and Interiors website
You will need
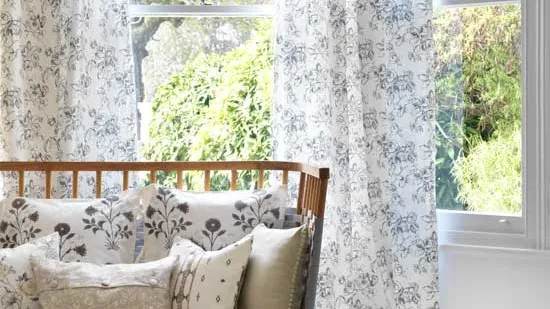
- Main fabric (we used Delphine, ref F0428/01, col Charcoal, £19 a metre, Clarke & Clarke)
- Tacking thread
- Matching thread

Step 1) For the length of your curtains, measure from your
curtain pole down to the point at which you want the bottom of your
curtains to hang and make a note of the measurement. For the width of
each curtain, decide how full you want the curtain to be: usually around
one to one-and-a-half times the length of the curtain pole. Again, make
a note of the measurement.

Step 2) For each curtain, add 10cm to the width measurement for hems; and 17cm to the length for hems and seams. From your fabric cut out your two curtains to these measurements, joining pieces and pattern matching if necessary.
Step 3)
Cut a 15cm facing to fit the width of each cut curtain, again you may
need to join pieces. For the ties, cut 30cm by 7cm strips. The ties will
be 2cm wide when finished and you will need to cut enough to fit across
the top of each curtain when spaced around 10cm apart.
Step 4) Right sides facing and matching raw edges, fold the ties in half lengthways. Machine stitch
along one short end and along the long edge taking a 1.5cm seam,
leaving the remaining short end open. Trim seam allowance, clip corners
and turn through. Press the tie, also pressing under the raw edges. Slip
stitch the opening closed and press. Fold each tie in half, this time
across the width, and press again (see illustration).

Step 5) Turn under 2cm then 3cm along each side edge of each curtain. Pin and press. Slip stitch or top stitch the hems in place. Remove pins. Repeat to hem the side edges of the facing strips.
Step 6)
Turn the top raw edge of the curtain under by 2cm and press. Lay the
curtain out, wrong side up. Place a folded tie flush with each side edge
of the curtain so that the folds of the ties lie 1cm below the top
folded edge and the ends of the ties hang free above the curtain. Place
the remaining ties, equally spaced between the two end ties (see
illustration). Pin then tack in place. Remove all pins.
Step 7)
On the facings turn under the top and bottom raw edges by 2cm and
press. Wrong sides facing and matching the folded top and hemmed side
edges, pin the facing in place over the ties on the back of the curtain.
Tack all round, working through the ties as you stitch. Remove pins.
Step 8) Top stitch the facing 5mm from the edges all round, securing the ties in place as you go. Remove tacking and press.
Step 9)
Turn under 5cm then 10cm along the bottom edges of the curtains and pin
in place. Tuck under the side edges of the hems at the corners to
create diagonal folds and pin in place. Using the ties, hang the
curtains in place at your window. Check the hems and adjust if necessary. Remove from window and slip stitch the hems in place. Press and hang your curtains.
Find more of our favourite makes on Country Homes and Interiors' new website. For the latest seasonal craft ideas join us on Facebook and Twitter.