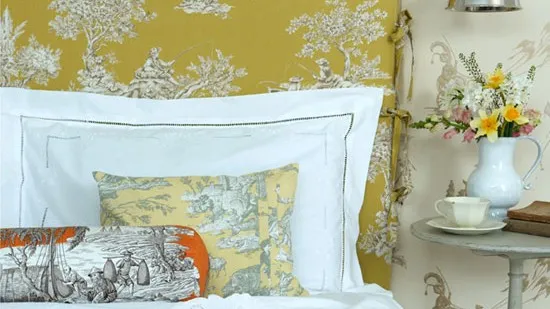
Inject homespun style into your bedroom with the latest country craft idea from Country Homes & Interiors.
Follow our easy-to-follow, step-by-step guides on how to make a stunning bolster cushion and a gorgeous pleated cushion.
How to make a bolster cushion

You will need
- Main fabric
- 45cm long by 17cm-diameter bolster cushion pad
- Tacking thread
- Matching thread
Please note that these instructions are to fit the size of bolster cushion pad stated above. If yours is a different size you will need to tailor the measurements to fit.
Step 1) Cut three pieces of fabric: one 50cm by 70cm; and two 22cm-diameter circles.
Step 2) Right sides facing, fold the main piece in half to form a ring by matching the raw edges along the short sides. Pin in place and tack 2.5cm from the raw edge. Machine stitch over the tacking for 5cm at each end. Press open seam allowance.
Step 3) Right-sides facing and matching raw edges, pin one circle in place at one end and stitch taking a 2.5cm seam (see illustration). Trim and clip into seam allowance all round. Repeat to attach the second circle
Step 4) Remove the tacking from the seam and turn cover through. Insert the bolster cushion pad, working the cover over each end for a snug fit. Using small, neat stitches, slip stitch the opening closed.
How to make a pleated cushion

You will need
- Main fabric
- 43cm by 33cm cushion pad
- 38cm zip
- Tacking thread
- Matching thread
Step 1) Cut a 56cm by 38cm piece of fabric for the front, and two 48cm by 22cm pieces for the back.
Step 2) Right sides facing, join the two back pieces together by tacking 3cm along one long edge. Machine stitch over the tacking for 5cm from each end. Press open seam allowance, open out the fabric and place right side down.
Step 3) Position the zip, also face down, centrally along the seam line and pin then tack in place. Remove pins and machine stitch in place. Remove tacking and keep zip closed.
Step 4) Lay out the front piece, right side up and with one long edge facing you. Pin then tack two 2cm pleats in place around 10cm to 15cm from the short, right-hand edge
(see illustration). Machine stitch each pleat, remove pins and press to the right-hand side. Tack the pleats flat inside the seam allowances (around 1cm from the raw edges) along the top and bottom. This will keep the pleats flat when you stitch the seam.
Step 5) Open the zip on the back piece and place right side up on a flat surface. Right sides facing and matching raw edges all round, place the pleated front piece on top.
Stitch all round taking a 2.5cm seam. Trim seam allowances, clip corners and turn through the zip.
Step 6) Insert the cushion pad, working the covers around the pad at the corners for a snug fit. Close zip.
How to make a bolster cushion
You will need
- Main fabric
- 45cm long by 17cm-diameter bolster cushion pad
- Tacking thread
- Matching thread
Please note that these instructions are to fit the size of bolster cushion pad stated above. If yours is a different size you will need to tailor the measurements to fit.
Step 1) Cut three pieces of fabric: one 50cm by 70cm; and two 22cm-diameter circles.
Step 2) Right sides facing, fold the main piece in half to form a ring by matching the raw edges along the short sides. Pin in place and tack 2.5cm from the raw edge. Machine stitch over the tacking for 5cm at each end. Press open seam allowance.
Step 3) Right-sides facing and matching raw edges, pin one circle in place at one end and stitch taking a 2.5cm seam (see illustration). Trim and clip into seam allowance all round. Repeat to attach the second circle
Step 4) Remove the tacking from the seam and turn cover through. Insert the bolster cushion pad, working the cover over each end for a snug fit. Using small, neat stitches, slip stitch the opening closed.
How to make a pleated cushion
You will need
- Main fabric
- 43cm by 33cm cushion pad
- 38cm zip
- Tacking thread
- Matching thread
Step 1) Cut a 56cm by 38cm piece of fabric for the front, and two 48cm by 22cm pieces for the back.
Step 2) Right sides facing, join the two back pieces together by tacking 3cm along one long edge. Machine stitch over the tacking for 5cm from each end. Press open seam allowance, open out the fabric and place right side down.
Step 3) Position the zip, also face down, centrally along the seam line and pin then tack in place. Remove pins and machine stitch in place. Remove tacking and keep zip closed.
Step 4) Lay out the front piece, right side up and with one long edge facing you. Pin then tack two 2cm pleats in place around 10cm to 15cm from the short, right-hand edge
(see illustration). Machine stitch each pleat, remove pins and press to the right-hand side. Tack the pleats flat inside the seam allowances (around 1cm from the raw edges) along the top and bottom. This will keep the pleats flat when you stitch the seam.
Step 5) Open the zip on the back piece and place right side up on a flat surface. Right sides facing and matching raw edges all round, place the pleated front piece on top.
Stitch all round taking a 2.5cm seam. Trim seam allowances, clip corners and turn through the zip.
Step 6) Insert the cushion pad, working the covers around the pad at the corners for a snug fit. Close zip.
Illustrations: Michael A. Hill