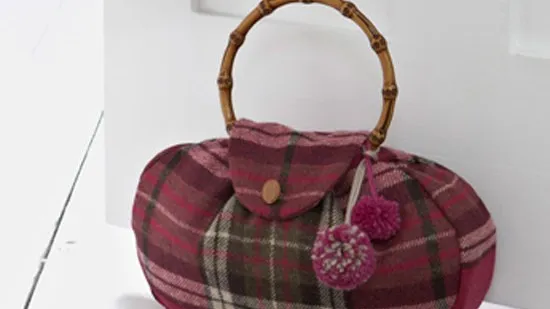
Use the pattern pieces provided to make this pretty accessory for a bedroom or living room. For more easy stitch projects like this one click here.
You will need
- Dressmaker's pattern paper or graph paper for patterns
- Main fabric (we used Lomond Tartan, ref F5880-03, £88 a metre, Osborne & Little)
- Close-weave cotton or linen fabric for lining
- Tacking thread
- Matching thread
- Sand (from builder's merchants or Argos)
- Decorative button
- Bamboo handle with D-ring fittings (the gap between the base of the handles needs to be at least 11cm)
- 2 woollen pompoms

Illustration Michael A. Hill

Step 1) Click here
for the main bag and flap pattern pieces and transfer to dressmaker's
pattern paper to the sizes shown. Or make to your chosen size. Cut out.
Step 2) You will need to cut two main bag pieces and two flap pieces. Fold the main fabric
in half and pin the two pattern pieces to the fabric. Use tailor's
tacks (see illustration) to mark the position of the darts. Cut out,
snip through the loops on the tailor's tacks, remove pins and carefully
lift of the patterns. Prise the two main bag fabric pieces apart
slightly and snip tailor's tacks so that each piece of fabric retains
threads to marking the dart positions. For the side gusset, cut a 13cm
by 85cm strip of main fabric, joining pieces as necessary.
Step 3)
Use the main bag pattern again, this time to cut out two pieces in
cotton fabric for the lining (there is no need to sew tailor's tacks).
Similary, cut a gusset strip in cotton fabric to the same size as the
main fabric piece.
Step 4) Using the tailor's tacks as a
guide, pin, tack and then machine stitch the darts in place on the wrong
side of the two main bag pieces. Remove pins and tacking and press each
dart towards the nearest side edge.
Step 5) Right sides
facing and matching raw edges pin one long edge of the gusset strip to
one main bag piece all round bar the top edge. Machine stitch taking a
1.5cm seam. Repeat to attach the second long edge of the gusset strip to
the second bag piece. Remove pins, trim and snip seam allowances and
press open seams.
Step 6) Repeat step 5 to join all the cotton lining pieces (there is no need to stitch the darts) and turn through.

Illustration Michael A. Hill
Step 7) To make the handbag flap, take the two fabric pieces
and, right sides facing and matching raw edges, pin and tack all round
bar the top, straight edge. Stitch taking a 1.5cm seam. Remove pins and
tacking, trim and snip seam allowances, turn through and press. Tuck in
the raw edges along the top straight edge by 1cm and tack the opening
closed.
Step 8) With the main fabric bag still inside out,
turn down 3cm along the top edge and press. Then tuck the raw edge under
by 1cm and pin in place all round. Slip stitch the hem in place and
remove pins.
Step 9) Turn the bag through and position the
flap centrally along the inside back edge so the straight edge of the
flap sits 1cm down from the top edge (see illustration). Pin then slip
stitch in place. Remove pins and tacking.
Step 10) Half fill the lining bag with sand (try Argos)
then push it into the main bag. Continue filling with sand until the
doorstop feels heavy enough to hold the door but not so full that the
lining bag will be difficult to remove through the opening should you
wish to wash the doorstop cover. Fold in the raw edges of the lining bag
and slip stitch closed.
Step 11) Bring the flap over to
the front of the bag and stitch the button in place, pushing the needle
through the flap and the front side of the bag. Use loose stitching that
can easily be removed should you wish to take out the lining bag later.
Step 12)
Cut strips of fabric to fit the handle D-rings. Press the raw edges in
all round and tack. Fold the strips in half lengthways, press, machine
stitch and remove tacking. Thread the loops through the D-rings and slip
stitch in place on either side of the bag to attach the handle.
Step 13) To finish, tie a couple of woollen pompoms in place around the base of the handle.