How to make your own retro-print apron
Create your own country pinny with our latest craft guide
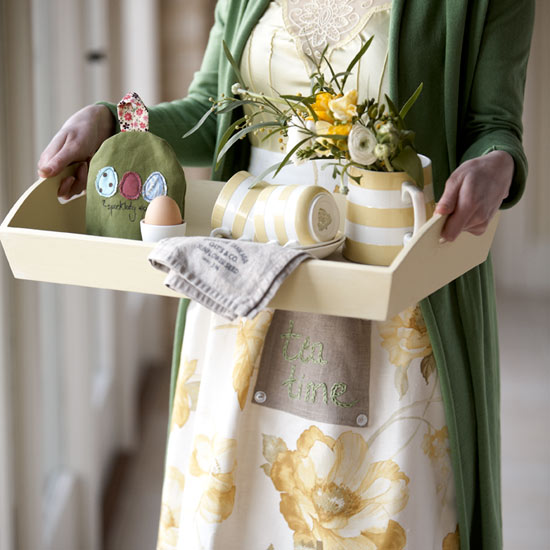
Inject homespun style into your home with the latest country craft idea. Follow our easy, step-by-step craft guide to making your own retro-print apron - the perfect finishing touch to classic rustic teatimes.
How to make your own retro-print apron

You will need
- Main patterned fabric
- Offcut of plain contrast fabric
- Matching thread
- Tailor's chalk
- Green yarn for embroidery
- Tacking thread
- 4 decorative buttons
1. Cut your pieces
From the main patterned fabric cut one 68cm by 60cm rectangle for the main apron piece, and one 15cm by 165cm strip for the tie (you will probably need to join pieces to make up the length). For the pocket, cut a 25cm by 22cm rectangle in plain contrast fabric.
2. Prep the pocket
On the pocket piece, turn 1cm of fabric under along the two long sides and one short side and press. Along the remaining short edge turn under 1cm then 3cm and top stitch to hem.
3. Embroider your pocket
Using the picture as a guide, use tailor's chalk to draw out the words ‘tea time' centrally on the front of the pocket. Thread an embroidery needle with a length of yarn and work the letters using chain stitch,
or any preferred embroidery stitch. Place a damp cloth over the pocket and press.
4. Press your hems
On the main fabric piece, turn under 1cm then 3cm along the two short edges and slip stitch hems. Then turn under along the bottom by 2.5cm then 5cm and slip stitch another hem. Press all hemmed edges.
5. Tack and sew the darts
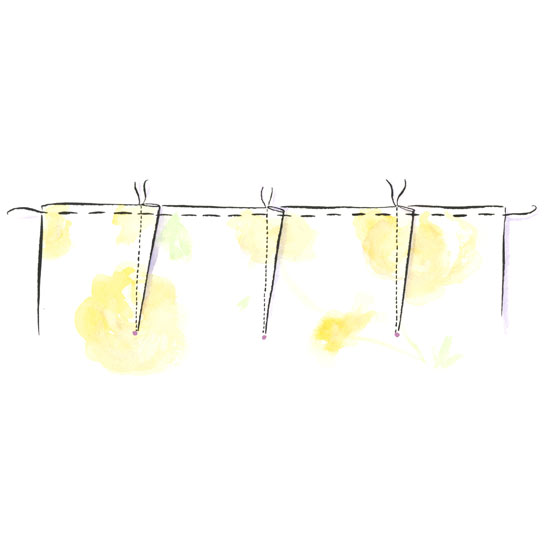
To make three darts along the top edge of the apron piece, measure 10cm down from the centre of the top raw edge and mark with tailor's chalk or a pin. Repeat to mark two more points equally spaced either side of the centre point.
Right sides facing, bring the fabric together along the raw edge to create a 1cm dart that tapers down to the central marked point. Tack the stitching line.
Sign up to our newsletter for style inspiration, real homes, project and garden advice and shopping know-how
Repeat to tack the remaining darts. Machine stitch each dart in place, remove tacking and press the darts to one side on the reverse. Baste along the top of each dart within the seam line to hold in place (see
illustration).

6. Create the apron tie
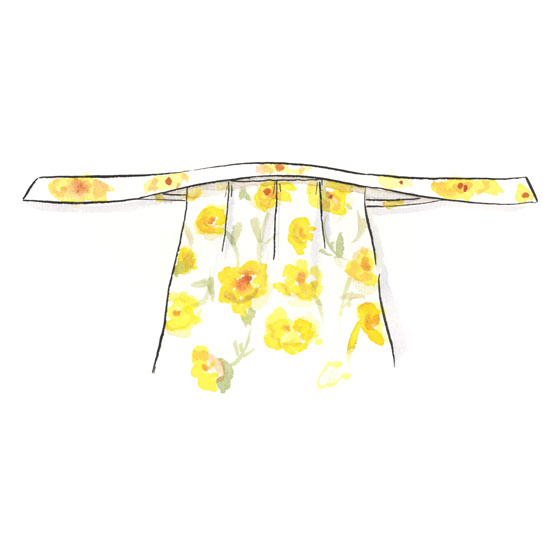
Take the tie strip and, right sides facing and matching raw edges, fold in half along the length. Taking 2.5cm seams, stitch each short edge and then from each corner along the long raw edge for 55cm, leaving a gap of 55cm in the centre. Trim short edge seam allowances and turn through. Press under the two raw edges by 2.5cm.
7. Place the apron piece right side up
Slip the tie in place over the top of the apron so that it encloses the top raw edge by 2.5cm (see illustration). Making sure that the bottom edges of the front and back of the tie are aligning, pin then tack in place through all layers. Remove pins. Top stitch 5mm from the lower edge of the tie, again through all layers. Remove tacking.

8. Sew on the pocket and finish off
Pin the pocket centrally to the front of the apron and top stitch in place along the sides and bottom, 1mm from the pressed-under edges. To finish, stitch a decorative button at each corner.