5 junk shop buys you can upcycle in less than 2 hours
Have you picked up a bargain from a charity shop or online and need some inspiration on how to revamp it? Take a look at our fab upcycling ideas, which will take you less than 2 hours to complete.

Whether you're new to upcycling or a seasoned crafting pro, don't miss these brilliant ideas...

Printed chateau table lamp, £24.99, Dunelm * Lampshade kit, £11.66 for 30cm design, Needcraft * 30cm La Paloma Multi fabric, £12 per m, Frumble * Chalk paint tester pots in Antibes Green, Antoinette and Emperor's Silk, £5.95 each, Annie Sloan * Soft clear wax, £8.95 for 500ml, Annie Sloan
1. Use chalk paint to paint the base of the lamp in coloured sections, avoiding the top part where the bulb slots in. Once dry, touch up to give neat lines between colours. Leave to dry.
2. Use a clothto cover teh painted base with protective clear wax and leave to dry. Buff to a low sheen to finish the base. Follow the manufacturer's instructions to cover the lampshade with the fabric and fit to the base.

Suitcase cat bed
Takes 1.5 hrs
Vintage-style suitacase * Chalk paint tester pot in Greek Blue, £5.95, Annie Sloan * Soft clear wax, £8.95 for 500ml, Annie Sloan * Linen tray cloth, £1.49, eBay * Inner cushion pad, £1.50, Ikea
1. Remove the suitacase lid by either taking off the hinges or cutting through the fold of the join with a craft knife or scalpel. Paint the suitcase inside and out and leave to dry before applying a second coat. Once completely dry, apply clear wax with a soft cloth.
2. Fold the tray cloth in half (right sides facing out) and stitch around the open edges, leaving a 10cm gap. Open the cushion pad and use the filling to stuff the cushion, then stitch the opening shut. Pop the cushion (and cat!) inside the suitcase to finish.

Découpage stool
Takes 1.5 hrs
Frosta stool, £8, Ikea * DecoArt paint in Turqouise and Christmas Red, £1.50 each, Hobbycraft * Russian doll gift wrap, £1.99, eBay * PVA glue, £2.50 for 500ml, Hobbycraft * Fine sandpaper * Paintbrush, pencil and scissors
1. Lightly sand the stool and wipe clean. Place upside down on the wrapping paper and draw around the seat. Carefully cut out the paper circle.
2. Paint the seat rim, outer edge and sides of each leg with the turqouise paint. Use red paint for the inside of the legs. Apply two coats of each colour, leaving to dry between each one. Brush a layer of PVA glue onto the seat and smooth the paper circle in place. Finish with a protective layer of PVA.

Pin cushion
Takes 30 min
Polystyrene egg, 42p, eBay * 15cm x 15cm remnant * Russian doll, £1.79 eBay * Glue and pins * Scissors
1. Put the bottom end (the wider part) of the egg in the centre of the fabric and gather at the top, pulling tightly around the egg. Secure in place with a few pins; trim off any excess.
2. Push the egg firmly into the doll base, with the bottom facing up. If it feels a little loose in the doll, secure with glue around the top rim to hold in place. Leave to dry then add pins.

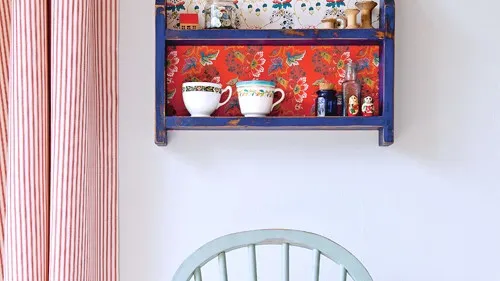
Upcycled shelf
Takes 2 hrs
Small wooden shelf, charity shop * Chalk paint tester pot in Napoleonic Blue, £5.95, Annie Sloan * Soft clear wax, £8.95 for 500ml, Annie Sloan * Hardboard, £5.79 per sheet, DIY store * Pepin Floral Premium Paper Booklet, £10 for a book of 12, Hobbycraft * PVA glue, £2.50 for 500ml, Hobbycraft * Fine pin nails and sandpaper * Metal ruler and craft knife
1. Lightly sand the surface of the shelf and wipe clean. Paint with two coats of the chalk paint. Once completely dry, use sandpaper to lightly distress the paintwork. Wipw clean then coat with clear wax and buff with a cloth once dry.
2. Place the shelf on the hardboard, matching the top and side edges, then draw around the remaining sides. Use a metal ruler and craft knife to score lines on the hardboard then gently fold it to snap along the lines. Mark the position of the middle with a pencil.
3. Brush PVA glue on the lower half of the baord and smooth the paper in place. Trim the excess, leaving a 2cm overhang. Repeat with top half using the second sheet. Turn over and stick down the overhanging paper.
4. Use nails to secure the backboard to the unit by hammering into the wooden frame and shelf. Hang using small hangers screwed through the board into the wood.
